3 Things To Do With Broken Headphones
This post may contain affiliate links which means that, if you choose to make a purchase, I may earn a small commission at no extra cost to you.
We all use headphones for something. Whether it’s listening to our favorite playlist, talking on the phone, drowning out the people around you that get on your nerves, and even to “read” a book on the go. Unfortunately, more often than not, the amazing headphones that we cannot live without, suddenly break. There has to be something that can be done with them right?
In this article, I will show you 3 things you can do if you av a broken set of headphones laying around. These for things are:
#1 – Fix your headphones. Wow, what a revolutionary idea right? Fixing your headphones is actually pretty simple. Some headphones are really expensive, and if you got the skills to fix them, you can save some serious money. In this section, I will show you step by step on how to fix your headphones.
#2 – Convert your headphones into speakers. You can easily turn your headphones into speakers. This is mostly for fun since the audio quality won’t be awesome. But it is cool to try out your MacGyver skills.
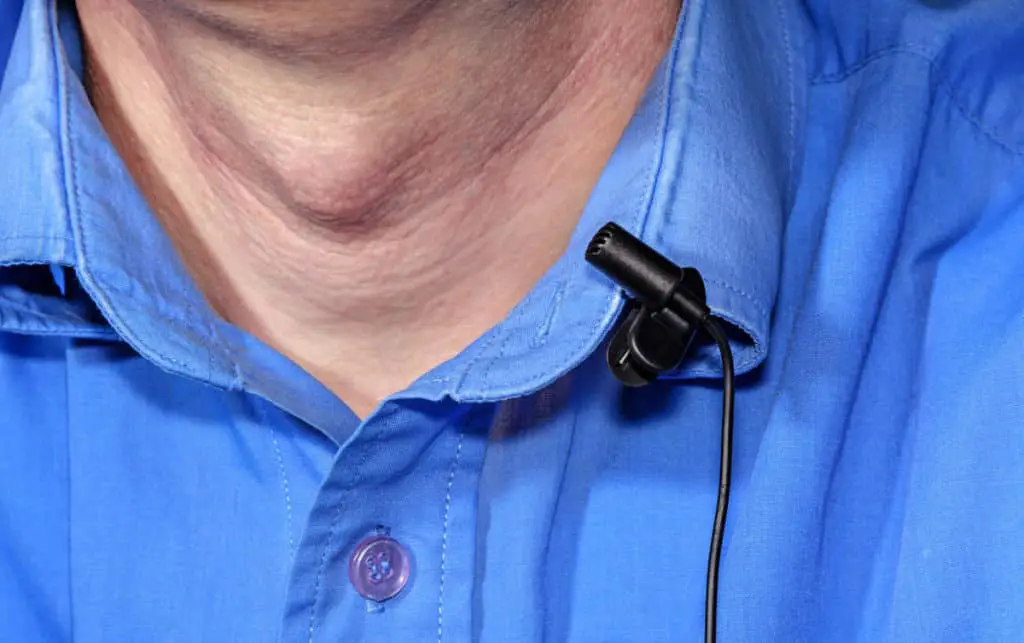
#3 – Turn your headphones into a microphone. Here we will turn our headphones into a lavalier mic. You’ve seen the small microphone on television where the host has a small microphone on the shirt. We will create this using the microphone on a typical earbud.
Breaking a pair of good headphones can be a bit depressing, especially when you are in the middle of listening to a song or book that you happen to really enjoy or when you can’t block out everything else when you’re trying to stay focused on a project that you are working on. First, let’s look at how headphones work so we can try to fix your headphones before we take the steps of replacing or repurposing them.
How Do Headphones Work? In Layman’s Terms Of Course
In headphones, loudspeakers, and earbuds, there is either a light metal cone, a piece of paper, plastic, or fabric that operates very similar to how a drum skin would work by vibrating to generate sound. The cone and the headphones’ are fastened together to the headphone’s outer metal rim and the inner part is attached to an iron coil or (voice coil) that is placed in front of a permanently placed magnet.
When headphones are connected to a device like a phone, the electrical signals move through the headphone cable into the coil which turns it into an electrical magnet. As the electricity flows back and forth between the cables, the electromagnet will either repel or attract the permanent magnet, moving the coil back and forth.
This will push and pull the headphone cone, just as striking a drum skin causes it to move back and forth as well, the moving cone will push the sound into the air producing music.
What Are The Main Components Of Headphones?
Headphones (in the simplest way to put it) are small speakers. They operate no differently than how a speaker operates except on a smaller scale at a lower decibel range and are composed of 2 main parts:
- A transducer: This is a device that is designed to convert electricity from one form into another. In this explanation, the transducer is converting the electricity into sound. A pair of headphones is comprised of 2 transducers that convert the electrical energy from the device you are listening to into sound energy allowing us to hear music from the speakers.
Quick Note!
Each speaker within a pair of headphones operates just like any circuit and requires a battery (source) to draw from and provide it to the transducer (load).
- The jack: This is what the conductor is connected to. The 3 metal pieces on the jack are actually 3 metal contacts that are responsible for powering the left headphone, while the sleeve on the jack provides the contact for the wires responsible for powering the right headphone. Now you know if something isn’t working in one of the headphones you know where the problem is.
Thing #1 – How To Fix Your Broken Headphones
As you know, and most likely the reason you’re here, breaking your headphones is no fun. So if there’s a way to fix them, especially if they’re one of the more expensive pairs like Sennheisers or Sony, you’re in no mood to have to go and replace those. You’ll have to have basic knowledge of electronics to do this but it’s not too difficult once you begin. Let’s begin with step one:
Step 1: Gather Everything You Need To Fix Your Headphones
In case you don’t know the common cause of your headphones breaking and not working is a fault that has occurred in the cable, so here replacing the cable is going to be the focus. Here is what you will need to get started:
- A quality replacement cable. The cost of this will run about $15.
- Self Setting Rubber: From research, a Suguru self-setting rubber is best as they come in a pack of 8 which will leave you with extras and run for about $20
- Solder and a soldering iron
- A solder remover
- Sandpaper (Sand grit is determined to be best)
- Wire strippers
- Wire Clippers
- Screwdrivers of various sizes
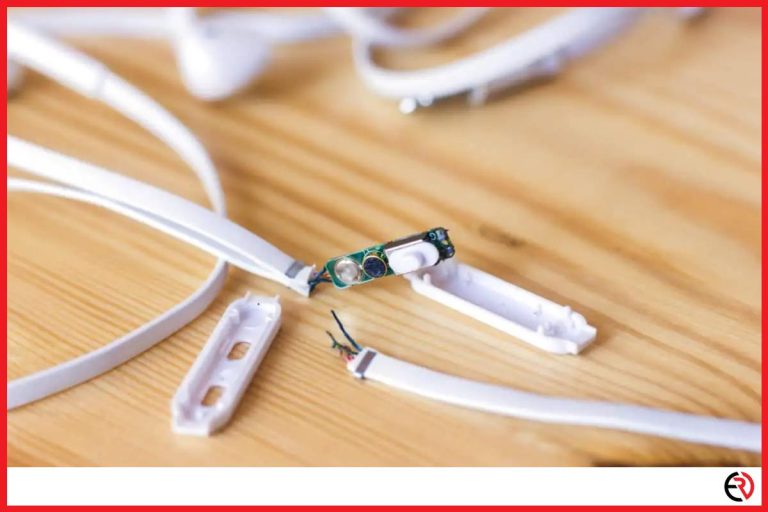
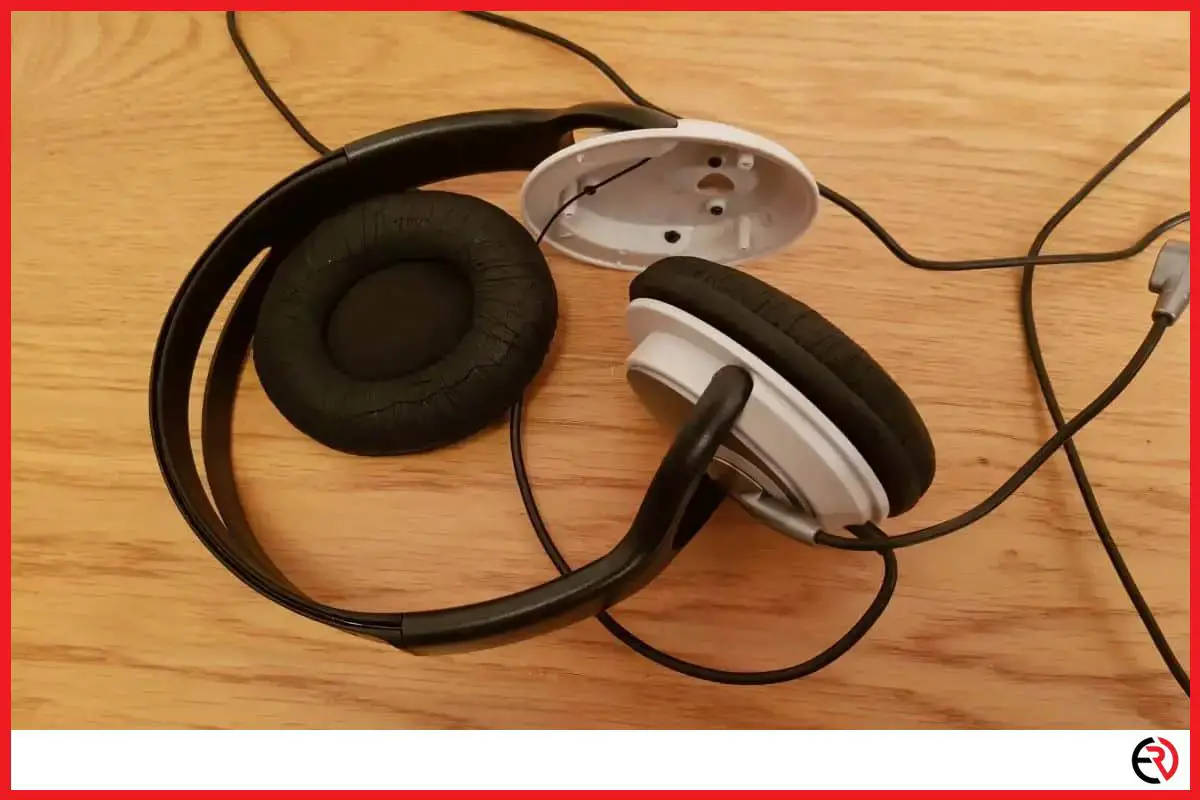
Step 2: Take The Headphones Apart
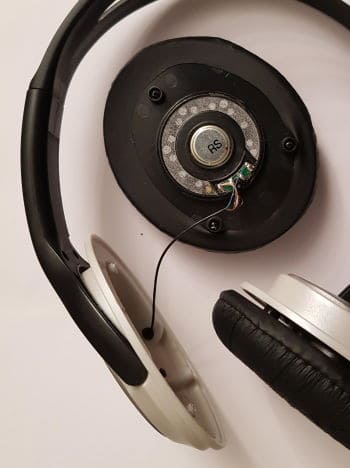
It is impossible to diagnose the issue with the headphones if you don’t take them apart. Most headphones can be disassembled from the ear cup by gently pulling on them to expose the screws that hold the speakers together.
After the screws are removed, you can pull the headphones apart and this will expose their internal circuitry. Take care to do this as gently as possible or you can risk further damage to the internal circuitry of the headphones and possibly place them in a state of disrepair beyond your capabilities.
Step 3: Remove The Old Wire From The Headphones
Like it was said before, most headphones stop working due to a fault in the wire so the objective is to completely remove and replace it. This is where your basic electronics repair skill comes into play.
Quick Tip!:
Regardless of how handy you may be, at times we cannot remember how everything was when we began a project. Use your smartphone to take a picture of the internal circuitry of the headphones to make sure you put everything back into its proper place.
- Using the clippers that you acquired earlier, use them to clip the wire where it is soldered into the headphones. After clipping the wire, go ahead and throw it away.
- Using the soldering iron, heat the old solder that is on the headphones circuitry until it begins to bubble. Be sure to repeat this step on all of the contacts within the headphones.
- After heating all of the contacts, you need to use the solder remover to get rid of the solder on the contacts.
Step 4: Prepping The New Wire To Replace The Old One
- Take the cable that you had purchased and use them to clip off the jacks that are designed to plug into a pair of headphones.
- You will need to use the wire stripper that you acquired before to strip the outer casing of the wire to expose its internal wires.
- There should be 2 sets of wires inside of the headphone cables. Typically the colors of the wire should be red or green and the other cable will be of copper. You will need to separate these two wire strands from each other and then twist them together. If there are some white strands, these are for insulation and you can trim these off.
- The red or green coloration on the wires are used to insulate them. Use the sandpaper from before to remove it from the ends so they don’t compromise your connection when you attempt to solder them.
Step 5: Attaching The Replacement Wire
Remember when it was suggested that you take a picture of the internal circuitry of the headphones after disassembly? This is where that was important. So hopefully you’ve followed along exactly to this point:
- In regards to the picture that you should have taken, you will need to match the colored wires (red and green) to the correct contacts as they were when you first disassembled the headphones. Here you will need to solder the appropriate wire to its respective contact.
- Connect the end of the jack that you did not clip off into a computer, phone, or MP3 player to make sure that the headphones are working. After this, you can move onto the finishing touches.
Step 6: Reassembling The Headphones
Now that your headphones are working. It is time to put on the finishing touches and put them back together. This is where the self-setting rubber comes into play:
- Use the self-setting rubber to attach the new cable to the headphones so it is securely locked into place.
- For added wire security, make sure to use the self-setting rubber to join the wire where it meets the body of the headphones.
- To reassemble the headphones from here, just place the headphones back together and put the screws back into place and screw them securely in place.
- Reattach the ear cup that you removed earlier. Do so carefully so that they aren’t damaged or torn during the process. It would be a bit disappointing to get this far and have to fix or replace something else.
- After this, test the headphones to ensure that they are still working.
Contrary to popular belief, headphones are a relatively simple piece of technology. If you follow these steps to repair them, you can extend their life by a few years.
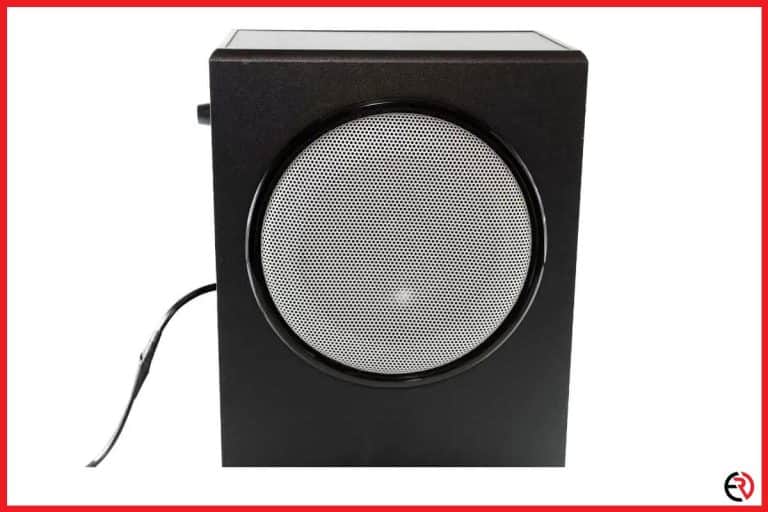
Thing #2 – Converting Your Headphones Into Speakers
There will be the potential off-hand chance that you won’t be able to fix your headphones, or just might not want to. In this case, there are some cool alternatives that you can use to still get some use out of these broken headphones through repurposing them. Here, we’re going to show you how to turn your broken headphones into a working speaker.
Step 1: Gather The Materials You Will Need To Convert Your Headphones
As with anything that you intend to assemble, you will need to get some materials together for the purpose of turning your headphones into speakers. Don’t worry, it’s not expensive to put together and it’s not rocket science either. Here’s what you will need for your conversion:
- Obviously, for this, you will need your broken earphones for this project. That’s why you’re here, to begin with.
- You are going to need 2 to 4 paper cups or something that is shaped like a cylinder to build the speakers.
- Glue
- Finally, an audio connector to insert into your phone, MP3 player, or computer.
Step 2: Disassemble The Broken HeadPhones
For this part, you will need to disassemble the headphones. Follow the instructions in the section ‘How To Fix Your Broken Headphones’ to do this part. If the speakers are not working, follow the steps in that section for replacing the wire before you continue with repurposing the headphones.
Step 3: Splitting The Cylinder In Half
Here you are going to take some measurements and prepare to split your cylinder in half for placing the headphone speakers in. This is not only to make sure that the divided cylinder is even when it is cut but also to ensure that the acoustics are the same. If not cut properly or evenly, the speakers may not sound the same after you have completed the project.
Next, proceed to use the glue that you have acquired to attach the headphone to the half of the cylinder that you split earlier. Make sure that the headphone attached evenly and centered within the cylinder. If it is not, the sound that comes from it will bounce around instead of producing the microphone effect that we are looking for.
Repeat the same steps for the other headphone to convert it into a speaker.
Step 3: Connecting Your Headphones (Optional)
If you like, you can connect the 2 speakers depending on what you used as a cylinder to create the speakers. This can be done with a small segment of metal pipe that you can use to screw the two headphone joints together. No glue is required for this step.
Step 4: Adding The Finishing Touches
If you used some pretty fancy or attractive materials as cylinders to connect the headphones to for your speakers, you are going to want to use electrical tape to cover up any glue that may be visible for aesthetic reasons. After this, make sure that you plug in the headphones to make sure that they work.
Remember most of the time a set of headphones stop working is because of a fault in the wire. if you follow the steps provided in the ‘How To Fix Your Broken Headphones’ section, you should be able to have working speakers.
Check out this cool YouTube video where you see how to turn your earbuds into a speaker using a Coca-Cola can.
Thing #3 – Try Turning Your Headphones Into A Microphone
If you’re a DJ or if you like to Skype and Facebook chat a lot, this is a great project for you. Especially if you don’t want to invest extra money into getting a new microphone if you don’t have one, or need to use a microphone in a pinch because you forgot yours at home or one wasn’t provided and you have an event. It’ll probably impress a few people as well.
Now before I get into how to convert your headphones into a working microphone, I hope you read the section on ‘How Do Headphones Work?’ to get a basic understanding of how headphones and microphones work especially since you’re going to be digging around in their internal circuitry.
How Does A Microphone Work?
First, you need to know that microphones and speakers operate very similarly to each other and have many of the same parts. However their jobs are opposite, microphones are designed to convert sound into electrical energy while speakers are designed to convert electrical energy into sound. Despite this, they are still composed of the same parts.
When you speaking into a microphone, the diaphragm (cone) vibrates, transforming the sound energy into electrical energy as it moves down the wires into the mixer preamps. The electrical energy that is sent, travels down the wires of the speakers, to the coils of the speaker. The coils will vibrate the sound cone within the speaker, creating sound.
So, a microphone essentially works the same way a speaker does. The process is just backward, which is what is going to make this conversion so much easier if your headphones are broken.
Quick Note!
Headphones are not built to act as a microphone usually so your sound quality will not be as great as it could be. This is for emergency use if something is wrong with your equipment or if you for some reason don’t have a microphone. It would be wise to invest in a quality microphone if this is something you are going to need on a regular basis.
How To Turn Your Headphones Into A Do It Yourself Lavalier Mic
So you might have trouble hearing sounds from your headphones. But the mic on those headphones might still work great.
For this project, we are going to take a pair of wired earbuds for the conversion. They may not be broken when you first bought them but they won’t be usable as headphones after this so that why we’re using them for this illustration.
Step One: Gather The Materials You Will Need
- Wired Earbuds with microphones
- A Headset Splitter Adapter
- A pair of electrical clippers
Quick Note!
The headphone splitter adapter’s job is to split the input into 2 signals: One signal for the mic and one signal for the headphones. If you are going to be using this on the standard mic inputs that are normally found on mixers and audio interfaces. On iPhones, the headphone input is already doing the split so this is not necessary for that. This also goes for Macbooks and iMacs as well.
Step 2: Preparing The Headphones For Microphone Conversion
As I said before if your headphones were not broken before this, they will be now (sorry). This is a permanent modification to the headphones that will strip it down to its microphones bare essentials. You will need to grab your headphones and identify the location of where the microphone and its controls are.
Once you have located it, you will need to take the electrical clippers and clip the wire that is leading to the earbud. This is what is going to operate at your microphone. After you have clipped this wire, proceed to clip the other earbud at the point where the 2 wires are joined together.
Quick Note!
Make sure that you take time to carefully identify what earbud can be used as a microphone. If you happen to clip the wrong wire, you won’t be able to use the headphones as a microphone. This does not apply to iPhone earbuds, however. As long as you don’t cut off below where the mic is located you will be able to use it as a microphone.
Step 3: Convert The Headphones Into A Microphone
Remember the headset splitter adapter you were told to use earlier? This is where it comes in handy. You will need to plug the jack of the former headphones (now microphone) into the adapter and connect it to the mixer or audio interface. The headphones (well mic) should be functioning as a small lavalier mic.
Quick Note!
An added benefit of this tiny mic is that not only can you use it at a gig if you are in a bind and don’t have your microphone, you can also shoot videos with it, thanks to its small stature it is easily concealable so it won’t be seen when shooting a video.
For you visual learners. Check out this YouTube tutorial on how it is done:
Things To Remember
As a rule of thumb, if you a pair of expensive headphones that you really like, you should always try to fix them first especially since you know how to do it now. But in the circumstances that you can’t fix them, don’t want to fix them, or if it is completely out of your knowledge base, you now know that there are ways for your headphones to have a new life and live on.
Remember if you are taking the time to repair your headphones that you should take a picture of its internal circuitry. This will make it easier to place your replacement wires in the proper places and not have to start over after beginning your repair project.
For the instances where the headphones can’t be repaired, fall back on these projects. If you can still get your headphones to produce sound but can’t wear them, turn them into speakers. If you’re at a show and have a broken set of headphones or don’t care to take a loss in a pair, turn them into a microphone when you’re in an equipment bind.